 ultimate-guide
Cost of Professional Mold Remediation: 2026 Pricing Guide
Table of Contents
- What Drives the Cost of Professional Mold Remediation
- Mold Remediation Cost Per Square Foot: What to Expect
- Does Homeowners Insurance Cover Mold Remediation?
- How Long Does Professional Mold Remediation Take?
- The Remediation Process: Inspection, Containment, and Clearance Testing
- Hidden Costs: Structural Repair and HVAC System Cleaning
- DIY vs. Professional Removal: When the Savings Aren't Worth It
- Frequently Asked Questions
Last Updated: September 11, 2026
What Drives the Cost of Professional Mold Remediation
The cost of professional mold remediation is not a single number. It is the sum of several variables: contaminated square footage, how far moisture has traveled, whether the HVAC system is involved, and how much material must be removed rather than cleaned. Two homes on the same street with visible mold can land at wildly different totals.
At Disaster Services, we see this constantly across the Greater Houston area after flooding and burst-pipe events. A small patch behind a baseboard is a different job than mold that has colonized wall cavities, insulation, and ductwork.
The biggest driver most homeowners underestimate is moisture source control. If water intrusion is not stopped first, remediation is temporary, spores need moisture and will return (the CDC). Any estimate that skips it is incomplete.
Factors That Increase or Decrease Your Total
Several variables push the number up or down:
- Square footage affected. Larger contaminated areas require more labor, more containment materials, and more disposal.
- Material type. Porous materials like drywall and insulation usually cannot be cleaned and must be removed (the EPA). Non-porous surfaces can often be cleaned in place.
- Access. Mold behind cabinets, under flooring, or inside wall cavities takes longer to reach.
- HVAC involvement. If spores have entered the ductwork, the system needs separate cleaning, which adds a distinct line item.
- Category of water damage. Clean water is simpler than contaminated water from flooding, which raises both safety requirements and disposal costs.
A common mistake is assuming the visible patch is the whole problem. The mold you can see is often a fraction of the growth hiding behind it.
Mold Remediation Cost Per Square Foot: What to Expect
Professional mold remediation is typically priced per square foot of affected area, and that unit price is the clearest way to compare estimates. It reflects labor, containment, HEPA filtration, disposal fees, and any biocide application required.
Most residential remediation work falls into three rough tiers. Treat these as planning bands, not quotes, every property is priced on its own scope:
| Scope | Typical affected area | Common $/sq ft band | What drives the number |
|---|---|---|---|
| Small / contained | Up to ~30 sq ft | Higher end of the range | Minimum job charges, setup, containment, and disposal dominate; labor is a small share |
| Mid-size | ~30-100 sq ft | Middle of the range | Drywall and insulation removal, HEPA air scrubbing, structural drying |
| Large / multi-room | 100+ sq ft | Lower end per sq ft, higher total | Economies of scale on labor, but HVAC cleaning, rebuild, and longer drying push the total up |
The counterintuitive part: the smallest jobs often carry the highest cost per square foot. A 10-square-foot patch still requires containment, negative air pressure, HEPA filtration, PPE, and a disposal run, fixed costs spread across very few square feet. A 300-square-foot basement spreads the same setup across thirty times the area.
Pricing also depends on materials and accessibility. Rather than quoting a flat rate, a reputable contractor should walk the property, measure the affected zones, and build an estimate from the actual scope.
Two homes with the same square footage can differ significantly in price if one requires drywall removal and the other only surface cleaning. Ask for the affected square footage in writing before signing.
A Worked Example of How the Math Moves
Say two homes each have 50 square feet of visible mold. In the first, the mold sits on painted concrete block in an unfinished basement, non-porous, with a fixed sump failure as the moisture source, so it can be cleaned in place. In the second, the same 50 square feet sits on drywall over wet insulation in a finished bedroom: drywall and insulation come out, the cavity must be dried, and the wall rebuilt.
The second job can easily cost several times the first despite identical visible square footage. That gap is the most common source of estimate shock, and why a good estimate lists affected square footage, material type, and whether removal or cleaning is planned per zone.
What Is Not Included in a Per-Square-Foot Rate
A per-square-foot remediation rate almost never includes:
- Third-party clearance testing. Usually billed separately by an independent inspector.
- Structural repair and rebuild. Drywall, flooring, trim, and paint go back on a separate construction budget.
- HVAC or duct cleaning. Priced per system or per vent run, not per square foot of room.
- Contents cleaning and storage. Furniture, textiles, and personal property are typically a separate line.
- Moisture source repair. Fixing the leak, pipe, or grading issue is a plumbing or waterproofing job, not a remediation one.
Compare estimates line by line. One that looks cheaper per square foot but omits clearance testing, containment, or disposal is not cheaper, it is incomplete.
Does Homeowners Insurance Cover Mold Remediation?
Homeowners insurance often covers mold remediation when the mold results from a covered peril, such as a sudden burst pipe or storm-driven water intrusion. It typically does not cover mold from long-term neglect or a slow leak.
Insurers draw a hard line between sudden and gradual damage. If water has seeped for months, the claim is likely to be scrutinized or denied, so document the timeline from discovery.
The Coverage Cap Most Homeowners Never Read
Even when mold is covered, most standard homeowners policies cap mold remediation at a fixed dollar limit, though the exact figure varies by carrier and policy form. That cap is usually separate from your dwelling coverage limit, so a large dwelling policy does not mean unlimited mold coverage.
Two consequences follow. A large remediation exceeding the cap leaves you paying the overage out of pocket. And the cap applies to remediation, not the rebuild, drywall, flooring, and paint fall under dwelling coverage, subject to your deductible, and are tracked separately. Homeowners who assume one number covers everything are often surprised when the cap is exhausted before the rebuild starts.
Check your declarations page for a mold endorsement, sublimit, or exclusion before you file. Knowing the cap up front tells you how much of the job insurance will actually absorb.
Common Reasons Claims Get Denied
Denials usually come down to a few recurring issues:
- Gradual damage. The insurer argues the mold developed over time from a maintenance issue.
- Excluded peril. Flood damage is often excluded from standard homeowners policies and requires separate flood coverage.
- Insufficient documentation. No photos, no moisture readings, no timeline.
- Pre-existing conditions. Mold that predates the policy.
- Failure to mitigate. The homeowner did not take reasonable steps to stop the water.
- Policy sublimit exceeded. The claim is valid but the mold cap is too low to cover the scope.
How to Build a Claim That Survives Review
The sudden-versus-gradual question is the battleground, and the burden of proof sits with you. The documentation that wins it is created in the first 24 to 48 hours:
- Photograph and video everything before you touch it. Wide shots to establish the room, close shots to show the mold, and a shot of any standing water or failed pipe.
- Capture moisture readings with a meter. A pin-type or pinless moisture meter reading at the affected wall, dated and photographed, is far stronger than a verbal description.
- Write a dated timeline. When you first noticed water, when you shut it off, when you called a professional. Keep it factual.
- Keep the failed component. A cracked supply line or failed shutoff valve is physical evidence of a sudden event.
- Get a written scope from a remediation contractor. An itemized scope with affected square footage and moisture mapping gives the adjuster something concrete to price.
- Do not discard removed materials until the claim is settled. Insurers sometimes want to inspect what came out.
This is where a contractor who understands the claims process helps. Disaster Services provides comprehensive insurance claims assistance, assembling documentation, moisture readings, and scope of work in a format adjusters can act on, reducing the back-and-forth that stalls claims.
If Your Claim Is Denied
A denial is not always final. Next steps include requesting the denial in writing with the specific policy language cited, filing a formal appeal with additional documentation, and, for disputed claims, engaging a public adjuster who works for you rather than the carrier. Public adjusters charge a percentage of the settlement, so they make the most sense on larger claims; on small jobs the fee can exceed the value of the dispute.
The practical takeaway: assume the claim will be scrutinized, document as if you expect a denial, and separate your remediation budget from your rebuild budget before work begins.
How Long Does Professional Mold Remediation Take?
Professional mold remediation generally takes a day for a small, contained area to several days or longer for extensive contamination involving multiple rooms or HVAC systems (the EPA). The timeline depends on the affected area, the materials involved, and how long drying and clearance take.
Small jobs with easy access move quickly. Larger jobs requiring containment, drywall removal, structural drying, and clearance testing take longer, and each phase must finish before the next begins.
The drying phase cannot be rushed, pushing ahead before materials are dry risks a rebound.
The Remediation Process: Inspection, Containment, and Clearance Testing
Professional mold remediation follows a defined sequence: inspection, containment, removal or cleaning, drying, and clearance testing. Skipping any phase undermines the result, so a proper scope is structured rather than improvised.
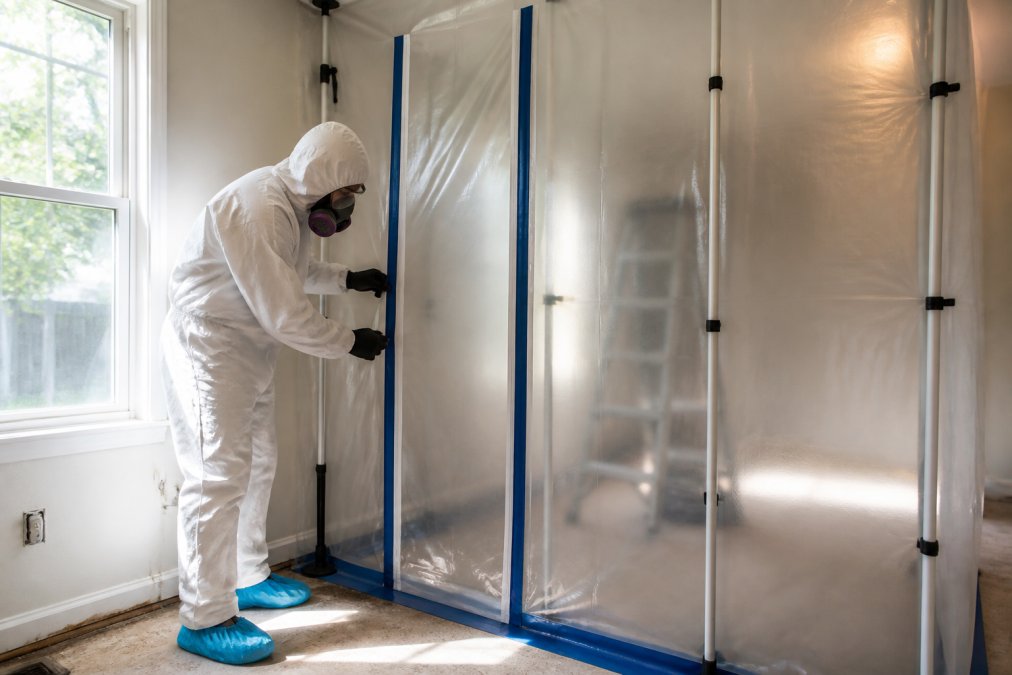
The process typically includes:
- Inspection and moisture mapping. Identify the mold, find the moisture source, and measure the affected area.
- Containment. Seal off the work zone with plastic barriers and negative air pressure to stop spores from spreading.
- HEPA filtration. Run air scrubbers to capture airborne mold spores.
- Removal and cleaning. Remove porous materials and clean salvageable surfaces with appropriate products.
- Structural drying. Run dehumidification until materials reach acceptable moisture levels.
- Clearance testing. Verify the work with air quality testing before containment comes down.
Post-Remediation Clearance Testing Explained
Post-remediation clearance testing confirms mold levels have returned to normal before the job is complete. An independent air quality test compares indoor spore counts against an outdoor baseline.
It is the only objective proof the remediation worked. Without it you rely on visual inspection, and mold hidden in a wall cavity does not show up visually. Ask for clearance results in writing.
Hidden Costs: Structural Repair and HVAC System Cleaning
Remediation and repair are two separate budgets. Remediation removes the mold; structural repair puts the building back together. Drywall removal, flooring replacement, and framing repair are often needed after contaminated materials come out, and those costs sit outside the remediation line.
HVAC cleaning is the other frequently missed expense. If spores entered the ductwork, the system needs dedicated cleaning, and running the HVAC beforehand spreads spores through the whole building. A thorough inspection should check the air handler and ductwork, not just visible rooms.
DIY vs. Professional Removal: When the Savings Aren't Worth It
DIY mold removal can work for a small patch on a non-porous surface where the moisture source is already fixed. It rarely works when mold has spread into wall cavities, insulation, or ductwork, or when the area is large enough to release significant spores when disturbed.
Health hazards are the deciding factor. Disturbing mold without containment and PPE releases spores into the air you breathe, for anyone with respiratory conditions, that risk is not worth the savings.
A practical way to decide:
| Situation | DIY Reasonable? | Professional Recommended? |
|---|---|---|
| Small patch, non-porous surface, moisture fixed | Yes | Optional |
| Mold on drywall or insulation | No | Yes |
| Mold in HVAC or ductwork | No | Yes |
| Area larger than a few square feet | No | Yes |
| Recurring mold after cleaning | No | Yes |
If you are unsure whether the mold is toxic mold or a surface stain, professional removal with proper inspection and air quality testing removes the guesswork.
Mold rarely stays contained, and the cost of professional mold remediation grows with every day the moisture source goes unaddressed. Disaster Services offers 24/7 emergency response, free visual inspection, and complete restoration and rebuilding, so you are not coordinating multiple contractors while your property deteriorates. Our licensed and insured technicians handle everything from initial inspection through insurance claims assistance and final rebuild. Contact Disaster Services today for a clear scope, a documented claim, and a property restored to a safe condition.
Frequently Asked Questions
Is it expensive to remediate mold?
Mold remediation costs vary widely based on the size of the infestation and the materials affected. Small areas might cost less, while large infestations can run into the thousands. Factors like hidden mold behind drywall, HVAC contamination, and structural damage increase the total. Because pricing depends on the specific scope of work, it is best to get a professional inspection and a written estimate rather than relying on generic national averages.
Will homeowners insurance cover the cost of mold remediation?
Standard homeowners insurance policies typically cover mold remediation only if the mold resulted from a sudden and accidental covered peril, such as a burst pipe or storm-driven water intrusion. Most policies exclude mold that stems from long-term neglect or gradual leaks. To get coverage, you must report the water damage promptly and document the source. If your claim is denied, review the specific exclusion cited and consider whether the damage truly fits the 'sudden and accidental' criteria.
How do professionals determine the price of mold remediation?
Professionals determine pricing by assessing the square footage of the affected area, the type of materials contaminated (porous materials like drywall often need removal, while non-porous surfaces can be cleaned), and the level of containment required. They also factor in labor hours, disposal fees, and whether HVAC system cleaning is necessary. A thorough inspection with air quality testing helps define the remediation scope before any work begins, ensuring the estimate reflects the actual work needed.
What factors increase the cost of mold removal?
Costs rise when mold is hidden behind walls, under flooring, or inside HVAC systems, as this requires demolition and specialized cleaning. Toxic mold strains like black mold may require stricter containment and personal protective equipment, adding labor hours. Other cost drivers include the need for structural repairs after mold removal, disposal fees for contaminated materials, and the use of HEPA filtration and biocide application. The longer the moisture issue has persisted, the more extensive the remediation scope becomes.
How long does professional mold remediation take?
Most residential mold remediation projects take between 1 and 5 days, depending on the extent of the infestation. Small, contained areas might be finished in a single day, while larger jobs involving multiple rooms, HVAC cleaning, or structural drying can take a week or more. The timeline also depends on whether post-remediation clearance testing is required, which adds a day for lab results. Proper drying and dehumidification between removal phases are critical to prevent regrowth.